10 Health
Displaying the Health Bar - Part 1
Now that we can manipulate the world and characters, let’s add to our player by giving them a health bar. First, copy the previous exercise into a new file as follows (replacing TVR with your initials):
cp 09_mob_TVR.py 10_health_TVR.py
We are going to create a health bar using images of hearts that are filled with various amounts to indicate Dr. Steve’s health. The files are displayed below.

These are actually three separate image files, but when we line them up like this, it looks like a single object. This is how we are going to construct the health bar. By looking at how much health the player has, we can determine how filled each heart should be and display the corresponding image in each place along the line.
First, we need to add some member variables to the window class init function.
Go to the end of the init function (just before the line with
def set_exclusive_mouse) on line 496, and add the following:
        #health bar setup: initally full health
        self.health = []
        for i in range(0,10):
            self.health.append(pyglet.resource.image("heart_2.png"))
        self.health_value = 10
        self.prev_health = 10
This creates a list of files saved in self.health which determines which file
will be displayed for each of the ten hearts. We then have a variable to hold
the numerical amount of health the player has and another which we will use later
to determine if the player has lost health.
Now we need to create some new functions to update the health and draw the health
bar on the screen. Find the line reading def on_draw(self) on line 817 and
insert the following functions above it:
The first function update_health(h) updates the value of self.health_value to
take on the value of h and determines which images should be displayed for
each heart. The second function draw_health() will be used to actually
draw the hearts onto the game window.
One new feature of this code is the use of sprites in draw_health. A sprite is an object in the pyglet library that is used to display images in the game window. Many sprites can share the same source image file, allowing us to display ten hearts on the screen while only having three actual image files. For more details on usage, please reference the pyglet Programming Guide.
Now we need to call the draw_health() function in our general on_draw()
function. Add a call to draw_health() in on_draw so that it reads as
follows:
Now if you run the code, you should see ten hearts displayed at the bottom of the screen as below.
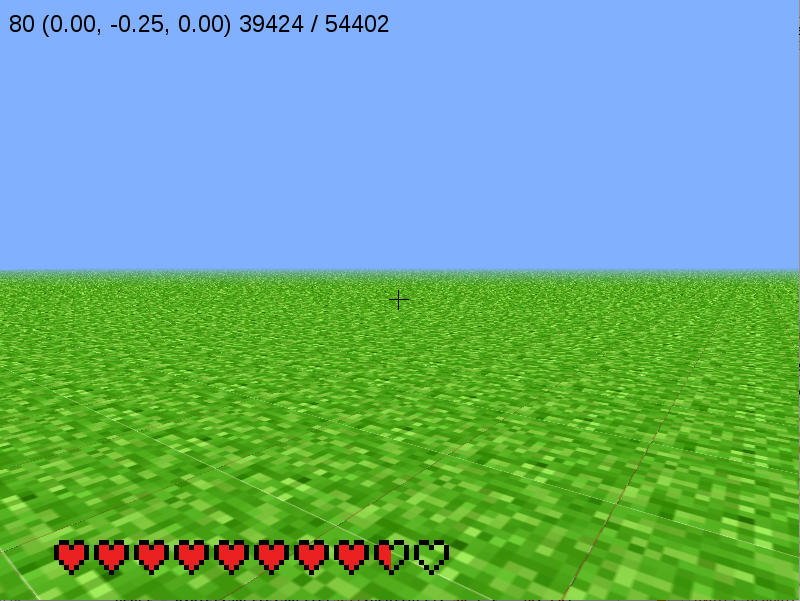
Notice that the empty hearts are transparent and you can see the world through them. This is because the original images are stored with .png (portable network graphic) file endings. This type of file supports transparency, meaning we aren’t constricted to only displaying images as squares, rather any shape you want.
Note that at this point we are only displaying the health bar. We have not implemented any ways that the player can lose health. This will be our next step.
You Can Lose Health by Falling- Part 2
Let’s implement a method that causes you to lose health. One of the most basic ways
a character can lose health in a game is falling too far and injuring themselves.
First, go back up to the init function in the window class (the function beginning
with the line def __init__(self, *args, **kwargs):) on line 496 and change
the code we just added to the end to read as follows:
        #health bar setup: initally full health
        self.health = []
        for i in range(0,10):
            self.health.append(pyglet.resource.image("heart_2.png"))
        self.health_value = 10
        self.fell_height = False
        self.max_vel = 0
We have removed the variable prev_health and added the variables
fell_height and max_vel. These will store whether or not we want to
change the health of Dr. Steve and the maximum velocity reached. max_vel
will help us determine how much health should be lost.
Now go to the function we defined as update_health() and add a new function
called check_height before it (line 818) as follows:
This function looks at self.dy, Dr. Steve’s vertical velocity and
determines whether it exceeds a safe range. If he is falling too fast, we want
to store the maximum magnitude (distance from zero) of the velocity and
acknowledge that we need to change Dr. Steve’s health when they land by
making fell_height true.
Now we need to make some changes to the draw_health function. Change this
function to read as follows:
Now if you fall a distance of four or more blocks, you will lose health. The longer you fall the more health you will lose.
No Health Left: Game Over - Part 3
Now let’s consider what happens if Dr. Steve runs out of health. The game
should end right? Let’s add a message that occurs when the Dr. Steve runs out
of health that tells the player the game is over. Just after the
draw_health on line 862 function, add the following:
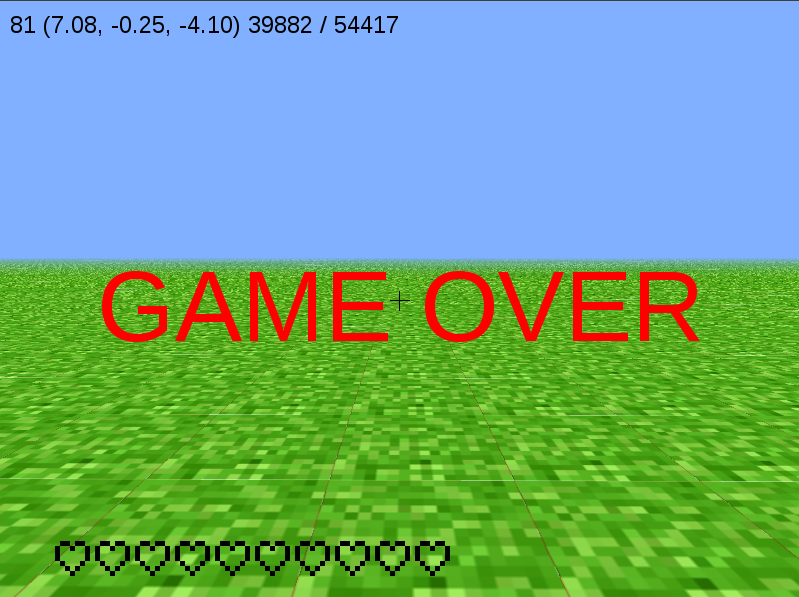
This code says that if health_value is zero, print the words “GAME OVER”
to the game play window and eject the mouse from the window.
Now add a call to the check_game_over function in on_draw() so it reads
as follows:
Now if you fall too many times the GAME OVER message will be displayed on the screen as below and the mouse will be freed from the game play window. You will not be able to continue playing unless you close the window and run the program again.
Enemies Hurt - Part 4
Remember the mob we created in the previous tutorial? Now we’re going to
combine that with the health bar we created in the previous section. Dr. Steve
should lose health when he gets too close to the active mob. First, let’s add
some more variables to the __init__ function in the window class. At the
end of the __init__ function on line 624, after the variables used to
define the health, add a new variable so the end of the function reads as
follows:
Now let’s create a function that checks if Dr. Steve is too close to an active
mob. For Dr. Steve to lose health, the mob needs to be loaded and close to Dr.
Steve. We also need to make sure that he doesn’t lose health at every
iteration of the game play loop which is where the new variable
count_injure is used. Before the on_draw function at line 1002 in the
window class, create a new function called check_mob_dist as follows:
Let’s walk through the logic behind this function. First, if the mob isn’t loaded, we don’t need to worry about it injuring Dr. Steve. The next checks only occur if the mob is loaded. Next, we find the distance in the x and z directions between the mob and Dr. Steve. We have defined a distance within which Dr. Steve can be hurt, so we check if Dr. Steve is close enough. If he is too close to the mob and hasn’t lost health because of the mob in at least 90 iterations, he should lose two health and update the display on the health bar.
Finally, we need to make a call to check_mob_dist in draw_health. Make
a call to check_mob_dist in draw_health so it reads as follows:
Now run the code, notice if you get too close to the mob, you’ll now lose
two health hearts. Don’t forget to load the mob by pressing the L key.